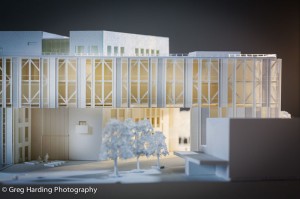
Late afternoon simulation
Earlier this week I was given the challenge of photographing an architecture model. For those not familiar with these objects, these are scale physical representations of what the proposed building is going to look like when built, it helps to convey the design ideas and concepts to the client. They're almost always hand-built, incredibly intricate and enormously expensive. Depending on their complexity, these things are worth thousands of pounds, so being careful with them is an understatement.
The first step before getting any kit out is to study the model. Look at its surfaces, material texture, building form, colour and size. This starts the pre-visualisation process.
My process:
Composing images and playing with creative concepts in your mind to help formulate a final image prior to starting the shoot is very important. Without it it would be like going out for a run and not knowing where you were going to go or when you were going to stop. Having a pre-visualised end goal is key to being a successful professional photographer, it enables you can communicate your ideas to your client before the shoot goes ahead and it stops you wasting time on the shoot. After years of practice you can get pretty proficient at it and you can also work out any potential issues without even being on the shoot. I often split the pre-visualisation up into different sections.
This is how is works for me, you may have better ways to achieve the same goal, in which case I want to know so put your suggestions below.
Set the perspective and then working out the lighting. Ask the question what's the viewpoint or perspective experience needed. Do you the viewpoint to be, high, low, close up or distant? This will narrow down your choice of lenses and provides clues to the depth of field you might need.
What do I want the lighting to look like? Is it aggressive, hard, soft, backlit, is the surface detail important to demonstrating its function? Does it need to look glossy, matt or reflective? Answering these questions will start to hone down the style of lighting needed, the direction and the quality of lighting required. The quality of the light is determined by the choice of modifier and the detail/texture of the object can be enhanced or reduced by the angle of the light in relation to the subject.
For this project I envisaged images that communicated a bit of drama and provided a three dimensionality to the model. The images would have a fairly shallow depth of field and a perspective that simulated some ground level experience.
The set-up
In a break out area within the architect's offices I erected a small on-location studio. This consisted of a white background and a two/three light set up. I regularly using a white background because of its versatile tonal range. You can light it for white, leave it unlit for gray (depending on the ambient conditions) or control the light spill and ambient to achieve a black. The model was predominately white plastic and clear perspex so a gray through to black was going to be used to provide a good contrast.
I used an 2 headed Elinchrom Quadra pack and supplemented this with a small speedlight to provide accent lighting. To give the model some shape I set the key light pretty high with a reflector modifier and small diffuser on the front. This would encourage sharp shadows and simulate a rising sun. The fill light was provided by a side lit softbox. Softboxes are good a wrapping light around objects and so I used this quality to even up the drop off created by the harsh reflector. Lastly the background tone and colour was controlled by a small speedlight. I experimented with using grid spot modifiers to produce a background vignette and even used it to push light through the model to highlight the windows or simulate a late evening sun as above.
I hope you can see the pre-visualisation impact on the images and I'd love to hear from you about your experiences in lighting small models.
Until next time.